Monday, December 25, 2017

Easy Stripe Checkout using AngularJS

Here's a simple way to use angularJS to integrate Stripe Checkout into your web page.

First, in your HTML add the Stripe script reference inside the head tag:

<head>
[angularJS includes here]
<script type="text/javascript" src="https://checkout.stripe.com/checkout.js"></script>
</head>

Next, in the body declare a link or button with an ng-click handler to invoke a method in your controller:

<a href="" ng-click="onStripe('<%= StripeConstants.PUBLIC_API_KEY %>', '<%= request.getAttribute("email") %>')">Stripe Checkout via angularjs</a>

*Note: My page is a JSP and since my user is already signed in I know the email so I push it in to the request object and pull it into my JSP page. Likewise, I load my Stripe public key (encrypted) from a properties file located on my server. Again, I pull that into my JSP and then pass both the user's email and the Stripe public key in to the click handler in my controller.

That's it for the HTML page. Now on to the controller.

I'll need two functions - the click handler to invoke Stripe Checkout and a function to handle the Stripe callback with the token representing the payment details.

// stripe will call this once it has successfully created a token for the payment details
        $scope.onToken = function(token) {
            console.log(token);
            // now call a service to push the necessary token info to the server to complete the checkout processing
        };

        $scope.onStripe = function(apiKey, userEmail) {
            var handler = StripeCheckout.configure({
                key: apiKey,
                image: 'https://stripe.com/img/documentation/checkout/marketplace.png',
                locale: 'auto',
                token: $scope.onToken
            });

            handler.open({
                panelLabel : 'Subscribe',
                amount : 4995,
                name : 'My Product Name here',
                description : '$49.95 Monthly Subscription',
                email : userEmail,
                zipCode : true,
                allowRememberMe : false
            });
        };


That's it!

Here's what the Stripe Checkout form looks like with the above configurations:

Monday, August 4, 2014

URL-Safe Compressed and Enhanced UUID/GUID

Below is a simple method to compress a UUID (128 bits represented by 32 hexadecimal characters with an additional 4 separator characters) into a 22 character string (base64). But, a 22 character base64 string can actually hold 132 bits of data (6 bits per char X 22 chars). As such, this method injects 4 additional random bits of data which increases the potential number of available unique identifiers by a factor of 16.

In addition, all the selected base64 characters are URL-safe.

Example:

This UUID : 7e47c34a-eebc-4387-b5a4-c6b558bdc407

is compressed down to this: 35Hw0ruvEOHbWkxrVYvcQH

public class KeyGen {

    private KeyGen() {
    } // constructor

    // base64url, see:  http://tools.ietf.org/html/rfc4648 section 5
    private static String chars
        = "ABCDEFGHIJKLMNOPQRSTUVWXYZabcdefghijklmnopqrstuvwxyz0123456789-_";

    /**
     * Generates a UUID and compresses it into a base 64 character string;  this
     * results in a 22 character string and since each character represents 6 bits
     * of data that means the result can represent up to 132 bits.  However, since
     * a UUID is only 128 bits, 4 additional randomize bits are inserted into the
     * result (if desired); this means that the number of available unique IDs is
     * increased by a factor of 16
     *
     * @param enhanced specifies whether or not to enhance the result with 4
     *                 additional bits of data since a 22 base64 characters
     *                 can hold 132 bits of data and a UUID is only 128 bits
     * @return a 22 character string where each character is from the file and url safe
     * base64 character set [A-Za-z0-9-_]
     */
    public static String getCompressedUuid(boolean enhanced) {
        UUID uuid = UUID.randomUUID();
        return compressLong(uuid.getMostSignificantBits(), enhanced)
               + compressLong(uuid.getLeastSignificantBits(), enhanced);
    } // getCompressedUuid()

    // compress a 64 bit number into 11 6-bit characters
    private static String compressLong(long key, boolean enhance) {
        // randomize 2 bits as a prefix for the leftmost character which would
        // otherwise only have 4 bits of data in the 6 bits
        long prefix = enhance ? (long)(Math.random() * 4) << 62 : 0;

        // extract the first 6-bit character from the key
        String result = "" + chars.charAt((int)(key & 0x3f));

        // shifting in 2 extra random bits since we have the room
        key = ((key >>> 2) | prefix) >>> 4;

        // iterate thru the next 10 characters
        for (int i = 1; i < 11; i++) {
            // strip off the last 6 bits from the key, look up the matching character
            // and prepend that character to the result
            result = chars.charAt((int)(key & 0x3f)) + result;
            // logical bit shift right so we can isolate the next 6 bits
            key = key >>> 6;
        }

        return result;
    } // compressLong()

} // class KeyGen


Saturday, April 26, 2014

Recipe for AspectJ 1.x, Jersey 2.x, Spring 3.x, Tomcat 7.x, Maven and AOP with Load Time Weaving

There's already a lot of information out there on the web about aspect oriented programming (AOP), Spring and AspectJ. And there are other good articles that explain some of the common pitfalls one may encounter when trying to get AOP up and running in an application that uses these technologies. One variant that doesn't seem to have a lot of information, however (at least that I could find), is using AOP with the combination of Spring 3, Tomcat 7 and Jersey 2.

The Spring documentation with respect to Tomcat (6 and below), Spring and AOP (with and without AspectJ) is excellent. See the Spring docs here for more information. Jersey adds a wrinkle to this because the Jersey web services are not Spring managed beans, so it's a little trickier to get AOP working for the service classes/methods.

So, what I hope to provide here is a simple recipe, if you will, for how to get the combination of technologies listed above working, with the additional requirement to perform load time weaving of the aspects into your code (as opposed to compile time or post compile time weaving). In addition, I will explain what you would see if you miss a step or don't get a step right so you can recognize the symptoms in your own setup and know what might need to be fixed.

Step 0 : you have a project to which you want to apply AOP

Step 1 : configure Tomcat

For load time weaving to work in Tomcat we need to supply a different class loader for Tomcat to use. Just include the spring-instrument-tomcat jar in your Tomcat lib folder (I'll show you how to tell Tomcat to use it in step 6 below).

You can find the correct version for your needs here. I used spring-instrument-tomcat-3.2.6.RELEASE.jar for my example.

If you don't include this jar in your Tomcat lib folder (or anywhere else Tomcat is configured to look for library jars) you will see this error (and several others) in the Tomcat logs:

Apr 26, 2014 11:08:02 AM org.apache.catalina.loader.WebappLoader startInternal
SEVERE: LifecycleException
java.lang.ClassNotFoundException: org.springframework.instrument.classloading.tomcat.TomcatInstrumentableClassLoader

Step 2 : configure Maven

You DON'T need this dependency, contrary to many of the examples you will find, but it will allow your aspects to compile, which may be confusing. The runtime classes are already included in the aspectjweaver dependency that follows.

        <dependency>
            <groupId>org.aspectj</groupId>
            <artifactId>aspectjrt</artifactId>
            <version>${aspectj.version}</version>
        </dependency>

My aspectj.version property is set to 1.8.0

You WILL need the below aspectjweaver dependency and if you omit it you will see the following error in the catalina (tomcat) logs:

java.lang.NoClassDefFoundError: org/aspectj/weaver/loadtime/ClassPreProcessorAgentAdapter

        <dependency>
            <groupId>org.aspectj</groupId>
            <artifactId>aspectjweaver</artifactId>
            <version>${aspectj.version}</version>
        </dependency>


Likewise, you do NOT need the spring-aop dependency if you're going to use the load time weaver (which we are in this case) and are not using any spring-aop specific capability:

        <dependency>
            <groupId>org.springframework</groupId>
            <artifactId>spring-aop</artifactId>
            <version>${spring.framework.version}</version>
        </dependency>


Step 3 : configure Spring

The only setting you need to add to the Spring application-context.xml file is:

<context:load-time-weaver aspectj-weaving="on"/>

You can omit the aspectj-weaving attribute which will cause the default to be used, but I include it here to call out that you could replace that value with an external property loaded into your Spring app context to control whether load time weaving was 'on' or 'off'.

If you do not include context:load-time-weaver in the Spring app context file you won't notice any errors in the Tomcat logs but your aspects won't execute either.

Step 4 : create your aspects and pointcuts, etc.

@Aspect
public class Observer {

    public Observer() {

    } // constructor

    @Around("execution(public * *(..))")
    public Object logAround(ProceedingJoinPoint joinPoint) throws Throwable {
        System.out.println("log from " + joinPoint.toString()); // @todo
        Object result = joinPoint.proceed();
        throw new IllegalArgumentException("this is only a test");

//        return result;
    }

    } // class Observer


The key thing here is how you define your aspects. In my case above I am using @Around and am intercepting all public methods in all my classes (I only have one web service class with one public method in this example). This was a fairly inclusive pointcut expression, with the intent to make sure it included my Jersey web service class. Consult the wealth of documentation on AOP to learn more about join points, point cuts, advices, etc. The Spring reference cited above is VERY good as is this article.

Step 5 : add META-INF/aop.xml to describe your aspects, pointcuts, etc. to AspectJ

This is the file used by AspectJ (you can have multiple aop files) to find and execute your aspects. If you don't include this file or if you put it in a location that won't make it on the classpath you won't see any errors in the Tomcat logs but your aspects won't execute either. So, in my example I put META-INF/aop.xml in src/main/resources and it will be added to WEB-INF/classes when Maven builds the war file.

<!DOCTYPE aspectj PUBLIC "-//AspectJ//DTD//EN" "http://www.eclipse.org/aspectj/dtd/aspectj.dtd">
<aspectj>
 <weaver>
  <!-- only weave classes in our application-specific packages -->
  <include within="org.hawksoft..*"/>
 </weaver>

 <aspects>
  <!-- weave in just this aspect -->
  <aspect name="org.hawksoft.aop.aspect.Observer"/>
 </aspects>

</aspec4j>


Step 6 : add META-INF/context.xml

This is the web context file used by Tomcat and this is where you tell Tomcat to use the instrumented class loader needed to create the proxies for your classes.

<Context path="/hawk-aop">
<Loader loaderClass="org.springframework.instrument.classloading.tomcat.TomcatInstrumentableClassLoader" />
</Context>

It is VERY IMPORTANT that you put this folder and file at the same level as WEB-INF in your project. If you don't put the web context.xml in the right location you will get the following error in the Tomcat logs when the web app is initialized:

2014 8:20:31 AM org.springframework.web.context.ContextLoader initWebApplicationContext
SEVERE: Context initialization failed
org.springframework.beans.factory.BeanCreationException: Error creating bean with name 'org.springframework.context.weaving.AspectJWeavingEnabler#0': Initialization of bean failed; nested exception is org.springframework.beans.factory.BeanCreationException: Error creating bean with name 'loadTimeWeaver': Initialization of bean failed; nested exception is java.lang.IllegalStateException: ClassLoader [org.apache.catalina.loader.WebappClassLoader] does NOT provide an 'addTransformer(ClassFileTransformer)' method. Specify a custom LoadTimeWeaver or start your Java virtual machine with Spring's agent: -javaagent:org.springframework.instrument.jar

So, to be clear, you will have TWO META-INF folders - one for the aop.xml that will be pushed into WEB-INF/classes when the war is built and one for the context.xml that is on the same level as WEB-INF.

Figuring this out was where the majority of my time was spent in trying to get this to work. This Spring forum conversation is what led me to figure out what was going on with context.xml and aop.xml and may be helpful to you as well - particularly the part about what Tomcat does/does not do with the context.xml file you include in your war.

Note: the 'path' attribute refers to the web app context path and unless you've instructed Tomcat to use a different context it is the name of your war file.

Here's the folder and file layout for my example Maven project:


Thursday, December 26, 2013

Jersey & JerseyTest migration from 1.x to 2.5 with Spring, JSP, Tomcat 7 and FreeMarker


I looked at upgrading to Jersey 2 a while ago but it didn't include important functionality I needed from the 1.x versions, like support for JSP templates, so I decided to wait (although I would have expected that a 2.0 release would have included all the capability from 1.x).

I recently went back and discovered that Jersey 2.5 now supports templates so I decided to take the plunge.  Just let me say that the experience has been very painful and end my rant there.  The high-level documentation is pretty good, and there are some useful working examples, but I had to dig into the Jersey source code to try to figure some things out and the low level documentation is not what I had hoped for.

Thus I am writing this article in hopes of sparing other poor souls from the pain I experienced in upgrading to Jersey 2 and getting the following combination of technologies integrated and working:

Jersey 2 + Jersey Test Framework + Spring + templates + Tomcat 7

If you're looking for information on Jersey 1.x please see my previous article on the Jersey Test Framework.

I had intended for JSP to be the template provider but I couldn't get it to work with the Jersey Test Framework (Grizzly2 container), which caused me to look at other options.  After much difficulty I was able to get FreeMarker working as the template provider, but without being able to include the Spring macro library (will explain alternative below).

First, let's look at the JerseyTest class.  Notice on line 8 the forward slash '/' in front of the folder name where I am putting the FreeMarker templates.  Please don't forget that.

At first I put my templates folder (call it whatever you want) at 'src/main/webapp/templates', which worked fine when the app was deployed to Tomcat but failed when the unit tests were being run under Grizzly2.  I then noticed in the Jersey source code for the FreeMarker examples and tests that they were putting the template files in the resources folder ('src/main/resources').  When I moved my .ftl files to that location FreeMarker could find them under both Tomcat and Grizzly.

As you can see from this snippet below, I've created my own abstract test class on top of JerseyTest so that I could have a shared configuration for all my web resource tests and include some other helper methods (not depicted) that help simplify my REST service tests.

public abstract class AbstractSpringEnabledWebServiceTest extends JerseyTest {

    @Override
    protected Application configure() {
        ResourceConfig rc = new ResourceConfig()
            .register(SpringLifecycleListener.class)
            .register(RequestContextFilter.class)
            .property(FreemarkerMvcFeature.TEMPLATES_BASE_PATH, "/templates")
            .register(FreemarkerMvcFeature.class)
            ;

        enable(TestProperties.LOG_TRAFFIC);
        enable(TestProperties.DUMP_ENTITY);

        return configure(rc);
    } // configure()

    protected abstract ResourceConfig configure(ResourceConfig rc);

    protected abstract String getResourcePath();

If you've used JerseyTest in Jersey 1.x you will notice some significant changes to how the tests are configured.  I'd like to say it's an improvement but I think you will agree it's much less intuitive.  In Jersey 1.x it was obvious we were building up a web.xml equivalent.  Not so in Jersey 2.  You'll have to rely more on the documentation, source code, blogs, and StackOverflow to to figure out how to set up your test web app correctly for your scenario.

Next is the concrete test class where we (a) provide the Jersey resource classes to load, (b) the location of the Spring context file to use, if using Spring, and (c) the root resource path, which should match the filter mapping from web.xml.

public class ResourceATest extends AbstractSpringEnabledWebServiceTest {

    @Override
    protected ResourceConfig configure(ResourceConfig rc) {
        rc.register(ResourceA.class)
            .property(
                "contextConfigLocation",
                "classpath:**/my-web-test-context.xml"
            );
        return rc;
    } // configure()

    @Override
    protected String getResourcePath() {
        return "/my/resource";
    } // getResourcePath()


Next, here's my web.xml:

<web-app version="2.4" xmlns:xsi="http://www.w3.org/2001/XMLSchema-instance"
    xmlns="http://java.sun.com/xml/ns/j2ee"
    xsi:schemalocation="http://java.sun.com/xml/ns/j2ee
                        http://java.sun.com/xml/ns/j2ee/web-app_2_4.xsd">

    <context-param>
        <param-name>contextConfigLocation</param-name>
        <param-value>classpath:/META-INF/spring/my-web-context.xml</param-value>
    </context-param>

    <context-param>
        <param-name>spring.profiles.default</param-name>
        <param-value>prod</param-value>
    </context-param>

    <!-- Spring -->
    <listener>
        <listener-class>org.springframework.web.context.ContextLoaderListener</listener-class>
    </listener>

    <listener>
        <listener-class>org.springframework.web.context.request.RequestContextListener</listener-class>
    </listener>

    <filter>
        <filter-name>My Jersey Services</filter-name>
        <filter-class>org.glassfish.jersey.servlet.ServletContainer</filter-class>

        <init-param>
            <param-name>jersey.config.server.provider.packages</param-name>
            <param-value>com.abc.resources.widget</param-value>
        </init-param>

        <init-param>
            <param-name>jersey.config.server.mvc.templateBasePath.jsp</param-name>
            <param-value>/WEB-INF/jsp</param-value>
        </init-param>

        <init-param>
            <param-name>jersey.config.server.mvc.templateBasePath.freemarker</param-name>
            <param-value>/templates</param-value>
        </init-param>
  
        <init-param>
            <param-name>jersey.config.server.mvc.templateBasePath.freemarker</param-name>
            <param-value>/templates</param-value>
        <init-param>
  
        <init-param>
            <param-name>jersey.config.server.provider.classnames</param-name>
            <param-value>org.glassfish.jersey.server.mvc.freemarker.FreemarkerMvcFeature</param-value>
        </init-param>
  
        <init-param>
            <param-name>jersey.config.server.tracing</param-name>
            <param-value>ALL</param-value>
        </init-param>

        <init-param>
            <param-name>jersey.config.servlet.filter.staticContentRegex</param-name>
            <param-value>(/index.jsp)|(/(content|(WEB-INF/jsp))/.*)</param-value>
        </init-param>

    </filter>

    <filter-mapping>
        <filter-name>My Jersey Services</filter-name>
        <url-pattern>/my/resource/*</url-pattern>
    </filter-mapping>

</web-app>

Here's my Jersey resource class.  Not much to call out here, except what I mentioned earlier about not being able to load the Spring FreeMarker macros.  In my case I wanted to use the spring.url macro as a replacement for c:url in JSP.  What I ended up doing in the short term is simply injecting the base url into my data map so I could then use it in my template.

@Service
@Path("/my/resource")
public class ResourceA{

    @Context
    private UriInfo _uriInfo;
    ...

    @Path("/resourceA")
    @Produces(MediaType.TEXT_HTML)
    @GET
    public Response getResourceA(@Context SecurityContext sc) {
        // fetch data for resource A

        // put data in map if it isn't already
        Map data = new HashMap<>();
        data.put("myData", data);
        data.put("baseUrl", _uriInfo.getBaseUri().toString());

        Viewable view = new Viewable("/myTemplate.ftl", data);

        return Response.ok().entity(view).build();
    } // getResourceA()

Finally is a snippet from my FreeMarker template file.  You can see the usage of 'baseUrl' that I included in the data model above.  One thing you might easily overlook is that I'm not using a 'model' prefix nor an 'it' prefix for the data elements.  In Jersey 1.x 'it' was required and the documentation for 2.5 states that the model will be passed in to the view as either 'model' or 'it'.  However, that didn't work and when I dropped the model prefix it started working.  Something to keep in mind as you troubleshoot any issues you may be having referencing your model data elements.

<head>
    <title>Web Resource A</title>
    <link href="${baseUrl}content/font-awesome/4.0.3/css/font-awesome.css"></link>        
         rel="stylesheet">
    <link href="${baseUrl}content/bootstrap/2.3.2/css/bootstrap.css"></link>        
         rel="stylesheet">
</head>

Oops - almost forgot the maven dependencies: (note: my spring dependencies are declared in my parent pom)

    <properties>
        <project.build.sourceEncoding>UTF-8</project.build.sourceEncoding>
        <servlet-api.version>2.4</servlet-api.version>
        <jersey.version>2.5</jersey.version>
        <jersey.scope>compile</jersey.scope>
        <jettison.version>1.3.3</jettison.version>
        <freemarker.version>2.3.20</freemarker.version>
    </properties>

    <dependencies>

        <dependency>
            <groupId>org.freemarker</groupId>
            <artifactId>freemarker</artifactId>
            <version>${freemarker.version}</version>
        </dependency>

        <dependency>
            <groupId>javax.servlet</groupId>
            <artifactId>servlet-api</artifactId>
            <version>${servlet-api.version}</version>
            <scope>provided</scope>
        </dependency>

        <dependency>
            <groupId>org.codehaus.jettison</groupId>
            <artifactId>jettison</artifactId>
            <version>${jettison.version}</version>
            <scope>provided</scope>
        </dependency>

        <dependency>
            <groupId>org.glassfish.jersey.test-framework</groupId>
            <artifactId>jersey-test-framework-core</artifactId>
            <version>${jersey.version}</version>
            <scope>test</scope>
        </dependency>

        <dependency>
            <groupId>org.glassfish.jersey.test-framework.providers</groupId>
            <artifactId>jersey-test-framework-provider-grizzly2</artifactId>
            <version>${jersey.version}</version>
            <scope>test</scope>
        </dependency>

        <!-- Required only when you are using JAX-RS Client -->
        <dependency>
            <groupId>org.glassfish.jersey.core</groupId>
            <artifactId>jersey-client</artifactId>
            <version>${jersey.version}</version>
            <scope>${jersey.scope}</scope>
        </dependency>

        <dependency>
            <groupId>org.glassfish.jersey.ext</groupId>
            <artifactId>jersey-mvc-freemarker</artifactId>
            <version>${jersey.version}</version>
            <scope>${jersey.scope}</scope>
        </dependency>

        <dependency>
            <groupId>org.glassfish.jersey.ext</groupId>
            <artifactId>jersey-spring3</artifactId>
            <version>${jersey.version}</version>
            <scope>${jersey.scope}</scope>
        </dependency>

    </dependencies>

Tuesday, August 6, 2013

Multiple content representations from a resource oriented RESTful web service

Here are a some thoughts on a few ways you can return multiple different representations of your resources from RESTful web services and still preserve the resource oriented nature of your architecture.

First, by representational differences I'm not talking about the format (JSON vs. XML, etc.). I'm talking about content.

Keep in mind that under the ROA style for REST you can use query params for selection, sorting and projection. Selection answers the question of which instances of the resource to return (which rows in database terms). Sorting is self-explanatory. Projection refers to which parts of the resource (which data points, or columns in database terms) to return.

So, when we're talking about multiple representations with respect to query params we're talking about projection.

Let's consider an example of a representation of a Customer resource with the following data points:
  • customer_id
  • first_name
  • last_name
  • address1
  • address2
  • city
  • state
  • zip
  • zip_plus_4
  • home_phone
  • mobile_phone
  • birth_date
  • birth_place
  • email_address
  • income
Now, imagine that the following URL returns a complete representation of the above Customer resource for a customer with customer_id 123:

        http://www.my-company.com/resources/customer/123

You will notice that we are doing selection, but we aren't using query params but rather putting the customer_id on the URL itself, which is a cleaner approach to REST.

Use projection via a query param

Now, what if a given client didn't want to consume all those data points and endure all the overhead associated with that.  If using a query param approach you could do something like this:

        http://www.my-company.com/resources/customer/123?include=customer_id,last_name,zip,email_address

The web service implementation for this would process the 'include' query param and build up a resource that included only those data points specified.  Under this approach you give the client maximum control of the resource representation.

Extract a sub-resource

Another way to obtain a subset of the Customer resource would be to extract a sub-resource.  For example, imagine we were only interested in the customer contact info consisting of customer_id, first_name, last_name, mobile_phone and email_address.  Then, we could use a URL like the following to obtain the contact information for the customer:

        http://www.my-company.com/resources/customer/123/contact_info

But, we've created a new URL endpoint, which may or may not be what we want.  How can we isolate the contact information without using query params and without changing the original customer URL?

Define a custom media type

Let's say we had defined a media type for the Customer resource as so:

        application/vnd.my-company.Customer-1.0

The client would pass this in as the Accept header to fetch the complete representation.  To isolate the contact information we could define a new media type like so and pass that in as the Accept header with the original URL:

        application/vnd.my-company.Customer.ContactInfo-1.0

Now, let's say the client is happy with the original customer representation, but wants to trim the size of it.  We could create a 'lite' version with abbreviated attribute names, such as lname for last_name, email for email_address and so on, and use a media type like the following to retrieve it:

        application/vnd.my-company.Customer-1.0-lite

You should be able to see the flexibility that custom media types provide.  You could create many different subsets of customer information and expose those as different flavors of the Customer media type.

Each of the above relies on being able to vary the resource representation independently from any object model supporting it.  See this article for more information.

Friday, August 2, 2013

RESTful Java Web Service Marshalling Comparison

 The case against automatic marshalling

I've been meaning to write this post for a very, very long time but I guess it was the look I got yesterday in a meeting when I recommended against automatically marshalling JAXB annotated model objects that pushed me over the edge. It was a look of "why would you even consider doing anything else?".

The notion that I can add a few annotations to my domain model class, make that the return type from my web service method and, viola, JSON or XML is magically returned to the client is very enticing. And you can certainly understand why developers would be motivated to want to do that.

But I'd like to offer some food for thought on why that might not be such a good idea and why architects, designers, those having to maintain the system and whoever's paying the bills should consider not allowing this approach in all but proof of concept or prototyping situations.

The first two problems, which are also the most significant, are very closely related:

Problem #1 : The inability to produce different representations from the same object model. I'm not talking about JSON vs. XML here (i.e. format). I'm talking about content and structure. You can only have one return type from a method and you can only mark up a given model class with annotations in one way. So, let's say you have client A that wants the full object representation returned - you're fine. But what if you have a client B that needs a different representation of that object? Perhaps fewer fields or abbreviated attribute names or some other subset of the object. You can't do it with automatic marshalling and use the same endpoint and without bloating the object model.  See this article for some ideas on how to produce multiple different representations from the same object model.

Problem #2 : The inability to support multiple versions of the REST contract off of the same object model. This one has the same root cause as above but a different use case for getting there. In this case I'm referring to changes to the object model that cause existing clients to break - breaking changes. In this case you can't simply reuse the same model class to support two incompatible representations of it - you have to create or extend a new model class. But, if you simply decoupled the REST response from your object model (i.e. don't use JAXB annotations and automatic marshalling) you can vary them independently and support multiple versions of your REST contract from the same object model - or at least you have the possibility of doing that, depending on the nature and extent of the changes.  Or, even simpler, maybe it's the REST contract itself that's changing (different attribute names, different structure, exposing fewer data elements due to a removed business feature, etc. etc.).  Auto marshalling can't expose two different contracts off the same object model.

Either one of those should be enough to discourage folks from using automatic marshalling in most cases, but there are still more reasons to avoid this approach...

Problem #3 : Your REST contract, and therefore your client, is tightly coupled to your domain/object model. You've basically opened up a window into the deep internals of your system and are allowing clients to peer into it. Some folks try to get around this by creating a secondary model object layer - a data transfer object layer, if you will - but they're still tighly coupled to a particular instance of a particular object model, they've bloated the overall object model, and they've greatly increased the object count at runtime.

Problem #4 : You lose control of the HTTP response and you won't have an opportunity to catch or log what just happened if there is a problem marshalling or unmarshalling your object.  In this case, the framework generates the exception and resulting response to the client - not your code - which is probably something you don't want to have happen.

Problem #5 : This is a consequence of attribute annotations in general in that they couple the classes being annotated to a particular use, albeit perhaps only logically. But, the implications of doing this can manifest themselves in very concrete ways. Let's say, for example, that RESTful representations and JMS messages are being created from the same model and let's say that the structure of the REST representation and the JMS message are different. OK, so you JAXB annotate the model classes for the REST layer and then the messaging team handcrafts the JMS messages from the same model - that will work and everything is fine. But, what if the messaging team needs to change the model layer to support some new changes to messaging and let's say these changes are breaking changes to the REST layer. Oops. This is really a variation of problems 1 and 2 above. Putting aside this contrived example, the key difference here is that we're introducing another developer (messaging team) who is unaware that the object model they are using in a loosely coupled manner has been tightly coupled by the web services team to their clients (changes to the model classes percolate all the way down to the REST clients).

Problem #6 : Clarity.  When you look at the web service class it's unclear precisely what's being returned and in what format.  Sure, you can see what object type it is, and you can look that up and examine it, but changes to the model will go unnoticed when looking at the web service.  You should be able to look at your web service class and see the entire contract that your service is providing.

Problem #7 :  The ability to fully enforce the REST contract.  Since changes to the model pass straight thru the web service layer you can't enforce the resource representation aspects of the REST contract.  However, if you decouple the model from the representation being returned (i.e. hand build the response) you have complete control over the contract.

Problem #8 : Reduced ability to refactor the service and domain layers.  Because the client is tightly coupled to the model you lose the ability to independently vary the model and thus are limited in your ability to refactor the system in a way that preserves the REST contract with existing clients.

Problem #9 : Extensibility of the REST contract.  This is a variation of #1 and #2, but from a different perspective.  If using auto marshalling you can't provide a different REST contract to different clients using the same underlying model.  Nor could you extend the contract to another system that makes use of auto marshalling (perhaps you want to use the adapter pattern on an inherited system to make it appear to have the same interface as yours - a consideration for growing and expanding companies and the kind of things architects are tasked with worrying about and considering).

Problem #10 : Lack of flexibility.  By using auto marshalling you lose the ability to compose a composite resource representation from multiple top-level objects.  In addition, nested hierarchies may or may not behave the way we necessarily want with auto marshalling.

Problem #11 : Time Savings.  It's not a tremendous coding time saver - not enough to justify introducing all the other problems mentioned here, despite what people may think.  It takes very little effort to code up a JSONObject or an XML document and just a little bit more to create a generic abstraction layer on top of that so you can produce JSON or XML or whatever.

Problem #12 : 
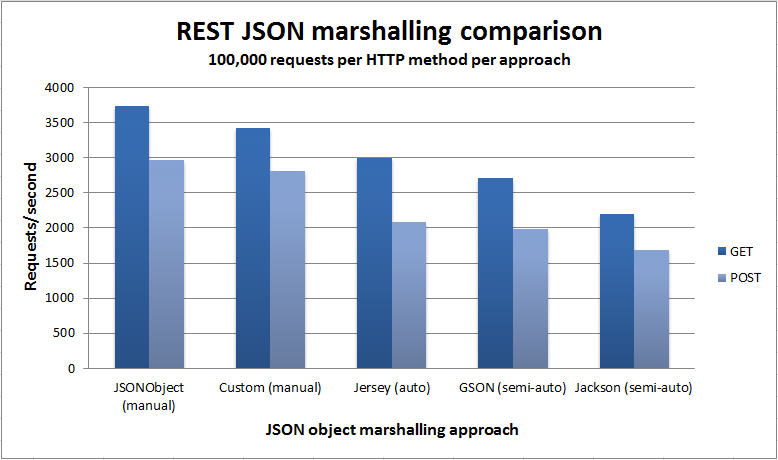
Performance.  I decided to take a closer look at the performance of various approaches for sending and receiving JSON representations to/from a RESTful web service.  I used the Jersey Test Framework to create a unit test that invoked the handler methods to GET and POST JSON data to/from the same underlying model object.  The only difference was the approach used to map the JSON to/from the underlying object.  The object itself consisted of a String field and a couple of int fields (see below).

The test iterated over each approach in a round robin fashion performing a GET and a POST.  That cycle was repeated 100,000 times. The metrics were captured in the unit test client, encompassing the entire request/response.  Here are the approaches that were evaluated:
  • Manually building the response using org.codehaus.jettison.json.JSONObject (ver 1.1)
  • Manually building the response using a custom implementation using StringBuilder (Java 1.7)
  • Automatic marshalling using the Jersey framework (ver 1.17) and underlying JAXB implementation
  • Instructing a com.google.gson.Gson (ver 2.2.2) instance to map an object to JSON  for us
  • Instructing a org.codehaus.jackson.map.ObjectMapper (ver 1.9.2) instance to map for us
As you can see from the chart below, the manual approaches to handling the JSON/object mapping were quite a bit better performing, and that makes sense as they don't have to use reflection to access the object and build up the response.  What was interesting was just how much better performing the manual approaches were.  That may or not be an important consideration depending on your situation, but it's information you should be armed with nonetheless and I encourage you to perform your own testing to see for yourself.  The best I can tell here is that the margin of error is about 5% as both manual approaches used the same POST handler yet the results for them differ by about 5%.  So, again, conduct your own tests in your own environment to see how the numbers shake out for you.

Marshalling Performance Comparison
Here's the interesting code from the web service showing the different approaches used. First is a complete POST handler. Each POST implementation is the same except for the mechanism used to turn the data into an ItemInventory object. I used custom media types to map to the various handlers, reusing the same URL/endpoint and in effect versioning the service.

Jersey :
@Path("/item")
    @Consumes(ITEM_INVENTORY_MEDIA_TYPE_JERSEY_JSON)
    @POST
    public Response createItemInventory2(ItemInventory inventory) {
        Response response = null;

        try {
            inventory = _inventoryManager.saveItemInventory(inventory);

            response = Response.status(201)
                .header(
                    "Location",
                    String.format(
                        "%s/%s",
                        _uriInfo.getAbsolutePath().toString(),
                        inventory.getItemId()
                    )
                )
                .entity(inventory.getItemId())
                .build();
        } catch (Exception e) {
            response = Response.status(500).entity(e.getMessage()).build();
        }

        return response;
    } // createItemInventory()


org.codehaus.jackson.map.ObjectMapper:
@Path("/item")
    @Consumes(ITEM_INVENTORY_MEDIA_TYPE_JACKSON_JSON)
    @POST
    public Response createItemInventory3(String data) {
        Response response = null;

        try {
            ItemInventory inventory = new ObjectMapper().readValue(data, ItemInventory.class);
            inventory = _inventoryManager.saveItemInventory(inventory);

com.google.gson.Gson:
@Path("/item")
    @Consumes(ITEM_INVENTORY_MEDIA_TYPE_GSON_JSON)
    @POST
    public Response createItemInventory5(String data) {
        Response response = null;

        try {
            Gson gson = new Gson();
            ItemInventory inventory = gson.fromJson(data, ItemInventory.class);
            inventory = _inventoryManager.saveItemInventory(inventory);

JSONObject (for the POST I did not write a custom handler, but instead used JSONObject):
@Path("/item")
    @Consumes({
                  ITEM_INVENTORY_MEDIA_TYPE_JSONOBJECT_JSON,
                  ITEM_INVENTORY_MEDIA_TYPE_CUSTOM_JSON
              })
    @POST
    public Response createItemInventory(String data) {
        Response response = null;

        try {
            ItemInventory inventory = jsonObjectToItemInventory(data);
            inventory = _inventoryManager.saveItemInventory(inventory);

...

    private ItemInventory jsonObjectToItemInventory(String data)
        throws JSONException {
        JSONObject jo = new JSONObject(data);
        ItemInventory inventory = new ItemInventory(
            jo.isNull("id") ? null : jo.getString("id"),
            jo.getInt("onhand"),
            jo.getInt("onOrder")
        );
        return inventory;
    } // jsonObjectToItemInventory()


Now for a complete GET handler, this time for Jersey:
@Path("/item/{itemId}")
    @Produces(ITEM_INVENTORY_MEDIA_TYPE_JERSEY_JSON)
    @GET
    public ItemInventory getItemInventory2(@PathParam("itemId") String itemId) {
        ItemInventory inv = null;

        try {
            inv = _inventoryManager.getItemInventory(itemId);

            if (null == inv) {
                throw new WebApplicationException(404);
            }
        } catch (Exception e) {
            throw new WebApplicationException(e, 500);
        }

        return inv;
    } // getItemInventory2()


org.codehaus.jackson.map.ObjectMapper:
@Path("/item/{itemId}")
    @Produces(ITEM_INVENTORY_MEDIA_TYPE_JACKSON_JSON)
    @GET
    public Response getItemInventory3(@PathParam("itemId") String itemId) {
        Response response = null;

        try {
            ItemInventory inv = _inventoryManager.getItemInventory(itemId);

            if (null == inv) {
                // not found
                response = Response.status(404).build();
            } else {
                String json = new ObjectMapper().writeValueAsString(inv);
                response = Response.ok().entity(json).build();
            }

com.google.gson.Gson:
@Path("/item/{itemId}")
    @Produces(ITEM_INVENTORY_MEDIA_TYPE_GSON_JSON)
    @GET
    public Response getItemInventory5(@PathParam("itemId") String itemId) {
        Response response = null;

        try {
            ItemInventory inv = _inventoryManager.getItemInventory(itemId);

            if (null == inv) {
                // not found
                response = Response.status(404).build();
            } else {
                Gson gson = new Gson();
                response = Response.ok().entity(gson.toJson(inv)).build();

JSONObject:
@Path("/item/{itemId}")
    @Produces(ITEM_INVENTORY_MEDIA_TYPE_JSONOBJECT_JSON)
    @GET
    public Response getItemInventory(@PathParam("itemId") String itemId) {
        Response response = null;

        try {
            ItemInventory inv = _inventoryManager.getItemInventory(itemId);

            if (null == inv) {
                // not found
                response = Response.status(404).build();
            } else {
                JSONObject jo = new JSONObject();
                jo.put("id", inv.getItemId());
                jo.put("onhand", inv.getOnhand());
                jo.put("onOrder", inv.getOnOrder());
                response = Response.ok().entity(jo.toString()).build();
            }

And finally the custom handler. JsonBuilder is my own helper class that provides JSON formatting and uses a StringBuilder internally:
@Path("/item/{itemId}")
    @Produces(ITEM_INVENTORY_MEDIA_TYPE_CUSTOM_JSON)
    @GET
    public Response getItemInventory4(@PathParam("itemId") String itemId) {
        Response response = null;

        try {
            ItemInventory inv = _inventoryManager.getItemInventory(itemId);

            if (null == inv) {
                // not found
                response = Response.status(404).build();
            } else {
                JsonBuilder jb = new JsonBuilder();
                jb.beginObject();

                jb.addAttribute("id", inv.getItemId());
                jb.addAttribute("onhand", inv.getOnhand());
                jb.addAttribute("onOrder", inv.getOnOrder());

                response = Response.ok().entity(jb.toString()).build();

If you're interested in the custom media types here's what they look like:
public static final String ITEM_INVENTORY_MEDIA_TYPE
        = "application/vnd.my-org.item.inventory";

    public static final String ITEM_INVENTORY_MEDIA_TYPE_JSONOBJECT_JSON
        = ITEM_INVENTORY_MEDIA_TYPE + ".JSONOBJECT+json";

    public static final String ITEM_INVENTORY_MEDIA_TYPE_JERSEY_JSON
        = ITEM_INVENTORY_MEDIA_TYPE + ".JERSEY+json";

    public static final String ITEM_INVENTORY_MEDIA_TYPE_JACKSON_JSON
        = ITEM_INVENTORY_MEDIA_TYPE + ".JACKSON+json";

    public static final String ITEM_INVENTORY_MEDIA_TYPE_CUSTOM_JSON
        = ITEM_INVENTORY_MEDIA_TYPE + ".CUSTOM+json";

    public static final String ITEM_INVENTORY_MEDIA_TYPE_GSON_JSON
        = ITEM_INVENTORY_MEDIA_TYPE + ".GSON+json";

Here's the JUnit test method used to exercise the above web service handlers:
@Test
    public void testCreateVersion2() throws InterruptedException {
        int onhand = 35;
        int onOrder = 3;

        int iterations = 100000;

        JSONObject resource = new JSONObject();
        try {
            String[] mediaTypes = {
                InventoryWebService.ITEM_INVENTORY_MEDIA_TYPE_CUSTOM_JSON,
                InventoryWebService.ITEM_INVENTORY_MEDIA_TYPE_JSONOBJECT_JSON,
                InventoryWebService.ITEM_INVENTORY_MEDIA_TYPE_JACKSON_JSON,
                InventoryWebService.ITEM_INVENTORY_MEDIA_TYPE_JERSEY_JSON,
                InventoryWebService.ITEM_INVENTORY_MEDIA_TYPE_GSON_JSON
            };

            long[][] timers = { {0, 0, 0, 0, 0}, {0, 0, 0, 0, 0} };

            // get the plumbing working 1st time
            WrappedClientResponse response = post(
                "/inventory/item",
                mediaTypes[0],
                resource.toString()
            );


            for (int i = 0; i < iterations; i++) {
                for (int j = 0; j < mediaTypes.length; j++) {
                    resource.remove("id");
                    resource.remove("itemId");
                    resource.put("onhand", onhand);
                    resource.put("onOrder", onOrder);

                    response = post(
                        "/inventory/item",
                        mediaTypes[j],
                        resource.toString()
                    );

                    timers[TIMER_POST][j] += response.getResponseTime();

                    assertEquals(201, response.getStatus());
                    assertNotNull(response.getHeaders().get("Location"));
                    String itemId = response.getEntity(String.class);

                    // now check to make sure we can fetch the item we just created
                    response = get(
                        String.format("/inventory/item/%s", itemId),
                        mediaTypes[j]
                    );

                    timers[TIMER_GET][j] += response.getResponseTime();

                    assertEquals(200, response.getStatus());
                    resource = new JSONObject(response.getEntity(String.class));
                    assertEquals(35, resource.getInt("onhand"));
                    assertEquals(3, resource.getInt("onOrder"));
                } // for
            }
            showStats(iterations, timers, mediaTypes);
        } catch (JSONException e) {
            fail(e.getMessage());
        }
        Thread.sleep(1000);
    } // testCreateVersion2()
Here are the convenience methods used by the tests to execute the HTTP requests and capture the metrics:
protected WrappedClientResponse get(String uri, String mediaType) {
        if (StringUtils.isEmpty(uri) || StringUtils.isEmpty(mediaType)) {
            throw new IllegalArgumentException("Programming error - required param missing");
        }

        WebResource resource = resource().path(uri);
        WebResource.Builder builder = resource.accept(mediaType);
        long start = System.currentTimeMillis();
        ClientResponse response = builder.get(ClientResponse.class);
        long stop = System.currentTimeMillis();

        WrappedClientResponse wrappedResponse = new WrappedClientResponse(response, stop - start);

        trace(response);

        return wrappedResponse;
    } // get()

    protected WrappedClientResponse post(String uri, String mediaType, String data) {
        if (StringUtils.isEmpty(uri) || StringUtils.isEmpty(mediaType) || StringUtils.isEmpty(data)) {
            throw new IllegalArgumentException("Programming error - required param missing");
        }

        WebResource resource = resource().path(uri);
        WebResource.Builder builder = resource.header("Content-Type", mediaType);
        long start = System.currentTimeMillis();
        ClientResponse response = builder.post(ClientResponse.class, data);
        long stop = System.currentTimeMillis();
        WrappedClientResponse wrappedResponse = new WrappedClientResponse(response, stop - start);

        trace(response);

        return wrappedResponse;
    } // post()

Here's the model class used for the testing:

@XmlRootElement
public class ItemInventory {

    private static final long serialVersionUID = -4142709485529021223L;

    // item ID
    @SerializedName("itemId")
    private String _itemId;
    public String getItemId() { return _itemId; }
    public void setItemId(String itemId) { _itemId = itemId; }

    // onhand
    @SerializedName("onhand")
    private int _onhand;
    public int getOnhand() { return _onhand; }
    public void setOnhand(int onhand) { _onhand = onhand; }

    // on order
    @SerializedName("onOrder")
    private int _onOrder;
    public int  getOnOrder() { return _onOrder; }
    public void setOnOrder(int  onOrder) { _onOrder = onOrder; }

    public ItemInventory() {}

    public ItemInventory(String itemId, int onhand, int onOrder) {
        _itemId = itemId;
        _onhand = onhand;
        _onOrder = onOrder;
    } // constructor

} // class ItemInventory

See this article to learn more about the Jersey Test Framework.

Friday, March 1, 2013

Increase quality and productivity with the Jersey Test Framework

Note:  This article applies to Jersey 1.x.  If you're looking for information on how to use the Jersey Test Framework in Jersey 2 please see this more recent article.

With the Jersey test framework developers can increase the quality of their software as well as their productivity without leaving the comfort of their favorite IDE.

The framework spins up an embedded servlet container that is configured to load the restful resources specified by the developer. In addition, the SpringServlet can be used to wire in the necessary beans if Spring is being used.

And, this is really super simple. The key is to extend the JerseyTest class and override the configure() method. In the configure() method you supply the same information that you would normally provide in your web.xml.

Line 5 : specify the package that contains the Jersey resource(s) you want to test
Line 6 : provide the name and location of the Spring context file (if using Spring)
Line 7 : turn on the JSON to POJO mapping feature if you want to use that

public class MyResourceWebServiceTest extends JerseyTest {

    @Override
    protected AppDescriptor configure() {
        return new WebAppDescriptor.Builder("com.mycompany.services")
            .contextParam("contextConfigLocation", "classpath:**/testContext.xml")
            .initParam("com.sun.jersey.api.json.POJOMappingFeature", "true")
            .servletClass(SpringServlet.class)
            .contextListenerClass(ContextLoaderListener.class)
            .requestListenerClass(RequestContextListener.class)
            .build();
    } // configure()
Once your test class is configured to spin up the embedded web container with your resources now it's time to write your tests. Again, the Jersey test framework makes it so easy even a caveman can do it.

On line 3 below we simply access a WebResource object and provide the relative URI to the resource we are interested in. This URI should match the @Path mappings in your Jersey resource definition.

Once the WebResource is defined simply use it to build and execute the HTTP request for the desired HTTP method, in this case GET, as shown on line 6. That's it. All that's left to do is the standard JUnit stuff to validate the response.
    @Test
    public void someTest() {
        WebResource webResource = resource().path("/some/resource/17");
        ClientResponse response =  webResource
            .accept(MediaType.APPLICATION_JSON)
            .get(ClientResponse.class);

        assertEquals(200, response.getStatus());

        try {
            JSONObject obj = new JSONObject(response.getEntity(String.class));
            assertEquals("widget", obj.get("type"));
        } catch (JSONException e) {
            fail(e.getMessage());
        }
    } // someTest()

Now, push a button or hit a key or two to kick off your JUnit test suite and watch your Jersey web services and tests fly.  If you need to make a change it only takes a minute or two to modify your code and run the tests again.

One piece of advice - create a test specific Spring context file targeting the exact REST resources you want to test and, if your resources eventually end up accessing some datasource (most would), consider injecting mock data access objects into your Spring beans so you can easily control the data that your resource would have access to, thus easily facilitating your testing (and development) and making your tests repeatable.

See this post if you want to learn how to easily create hyperlinks in your Jersey REST services.

See this post if you want to see more examples of Jersey unit testing or comparisons of different ways to marshall your data/objects.

Wednesday, February 27, 2013

How to return a Location header from a Jersey REST service

If you're following the Resource Oriented architectural style (ROA) for REST you're often interested in building and returning hyperlinks to your resources in your web service responses.

In the case of an HTTP CREATE, in addition to returning an HTTP 201 response code, you're also going to want to return a hyperlink to the newly created resource in the Location header of the response.

The Jersey JSR 311 implementation makes this a trivial task.  The first step, as you can see in line 2 below, is to inject a UriInfo class member using the Jersey @Context annotation.  Jersey recognizes a number of different resources that can be injected into your service classes via the @Context annotation.  In this case we're interested in information about the URI of our web service.

Once you've completed the work of creating your new resource (whatever that happens to be) and you're ready to formulate a response it's a simple matter to create the hyperlink and place it in the Location header of the response.  The key is to get the absolute URI to this current service as we're doing in line 21 below.  And assuming your URI convention is to tack the ID on to the URI for the CREATE service (as it probably should be in REST) simply append the ID to the absolute URI and use the Jersey Response builder to complete your response.

The hyperlink we just created should look something like http://mydomain/services/resource/1234 and map over to the GET-mapped service shown below starting on line 34.

    @Context
    private UriInfo _uriInfo;
  
    @Path("/resource")
    @POST
    public Response createResource(String data) {
        Response response = null;

        try {
            // convert data to model object
            Model model = someConversionMethod(data);
            // save model object
            _businessManager.saveModel(model);

            // formulate the response
            response = Response.status(201)
                .header(
                    "Location",
                    String.format(
                        "%s/%s",
                        _uriInfo.getAbsolutePath().toString(),
                        model.getId()
                    )
                )
                .entity(model.getId())
                .build();
        } catch (Exception e) {
            response = Response.status(500).entity(e.getMessage()).build();
        }

        return response;
    } // createResource()

    @Path("/resource/{id}")
    @GET
    public Response getResource(@PathParam("id") String id) {
        ... 
See this post if you want to learn how to easily test your Jersey REST services.

Sunday, November 18, 2012

UML Class Diagram Relationships, Aggregation, Composition

There are five key relationships between classes in a UML class diagram : dependency, aggregation, composition, inheritance and realization. These five relationships are depicted in the following diagram:

UML Class Relationships
The above relationships are read as follows:
  • Dependency : class A uses class B
  • Aggregation : class A has a class B
  • Composition : class A owns a class B
  • Inheritance : class B is a Class A  (or class A is extended by class B)
  • Realization : class B realizes Class A (or class A is realized by class B)
What I hope to show here is how these relationships would manifest themselves in Java so we can better understand what these relationships mean and how/when to use each one.

Dependency is represented when a reference to one class is passed in as a method parameter to another class. For example, an instance of class B is passed in to a method of class A:  
public class A {

    public void doSomething(B b) {

Now, if class A stored the reference to class B for later use we would have a different relationship called Aggregation. A more common and more obvious example of Aggregation would be via setter injection:
public class A {

    private B _b;

    public void setB(B b) { _b = b; }

Aggregation is the weaker form of object containment (one object contains other objects). The stronger form is called Composition. In Composition the containing object is responsible for the creation and life cycle of the contained object (either directly or indirectly). Following are a few examples of Composition. First, via member initialization:
public class A {

    private B _b = new B();

Second, via constructor initialization:

public class A {

    private B _b;

    public A() {
        _b = new B();
    } // default constructor

Third, via lazy init (example revised 02 Mar 2014 to completely hide reference to B):

public class A {

    private B _b;

    public void doSomethingUniqueToB() {
        if (null == _b) {
            _b = new B();
        }
        return _b.doSomething();
    } // doSomethingUniqueToB()

Inheritance is a fairly straightforward relationship to depict in Java:

public class A {

    ...

} // class A

public class B extends A {

    ....

} // class B


Realization is also straighforward in Java and deals with implementing an interface:

public interface A {

    ...

} // interface A

public class B implements A {

    ...

} // class B

Note: (added 3/2/14 in response to comments) Let me point out that in the above composition examples 'new' could be replaced with a factory pattern as long as the factory does not return the exact same instance to any two different containing/calling objects, which would violate the key tenet of composition which is that the aggregated objects do not participate in a shared aggregation (two different container objects sharing the same component part object). The builder pattern could also be used as long as the distinct 'parts' are not injected into more than one containing object.

6/29/2014 - here's a good article on class diagrams and answers Ivan's question below in the comments:

http://www.ibm.com/developerworks/rational/library/content/RationalEdge/sep04/bell/

Tuesday, October 9, 2012

ActiveMQ Producer Flow Control Send Timeout

ActiveMQ has a feature called Producer Flow Control that throttles back message producers when it detects that broker resources are running low.  In fact, it will block threads sending messages until resources become available.

You can configure the broker to timeout the message send so that it does not block when producer flow control is in effect, but this is a global setting and you cannot configure it per queue.

However, the ActiveMQConnection class has a setSendTimeout() method, but it is not exposed via the JMS connection interface.  There are a couple of ways to handle this.

First, you could simply cast your connection object to an ActiveMQConnection and then call the setSendTimeout method directly.  This works fine if you know for sure your implementation is ActiveMQ and you have access to the ActiveMQ libraries at compile time (in other words, you don't mind having this dependency in your messaging client).

try {
    // Create a ConnectionFactory
    ActiveMQConnectionFactory connectionFactory
        = new ActiveMQConnectionFactory("tcp://localhost:61616");

    QueueConnection connection = connectionFactory.createQueueConnection();
    ((ActiveMQConnection)connection).setSendTimeout(5000);
    ...

A second way to handle this would be to use Java reflection to dynamically invoke the setSendTimeout() method if it is available, like so:

try {
    ...

    QueueConnection connection = connectionFactory.createQueueConnection();

    try {
        Method setSendTimeout = connection.getClass().getMethod(
            "setSendTimeout",
            int.class
        );
        if (null != setSendTimeout) {
            setSendTimeout.invoke(connection, 5000);
        }
    } catch (Exception e) {
        System.out.println("could not invoke the setSendTimeoutMethod"); 
    }
    ...

With this approach, you can configure send timeouts per connection and you can be somewhat JMS provider agnostic in your client. Keep in mind that if you use a container to provide your JMS connection factory the connections you get back may not be ActiveMQ connections, but rather proxy objects that wrap an ActiveMQ connection.

Friday, September 28, 2012

Project Management, Agile and the Replacement Refs

An article I read this morning mentioned that now that the regular NFL refs are back on the job the referees have faded into the background and the game itself has taken center stage again.  Relative calm and order have been restored and fans, players and coaches can focus on the product (football) and not the administration of it.

I got to thinking about it and I realized how much that applied to project management on agile projects (I'm referring to organizations, like mine, that are project management centric, rooted in waterfall methodologies, and trying to implement scrum in a move toward agile).

Traditional project management on agile projects, where the focus is primarily on schedules, timelines, budgets, status meetings, resources, timekeeping, etc. etc. is akin to replacement refs in a professional football game - the management of the project is too visible and steals center stage.

So, bring back the regular refs and restore the integrity of agile by making the product itself the center of attention, surrounded by the team member collaborations and customer interactions that comprise the real game of agile and let project management quietly fade into the background where it can unobtrusively maintain calm and order.

Disclaimer: I think the replacement refs were put in a tough position where limited training, high expectations and the speed of the game made their ability to succeed a tough proposition from the very outset. I think the same can be said of traditional project managers on agile projects.

Friday, August 31, 2012

slf4j5 - Java logging even faster

In my previous posting where I introduced slf4j5 I reported that, to my surprise, performance was better than when using slf4j by itself - probably due to the usage of the Java 5 String formatter.

Inspired by this I took a closer look at performance and ended up creating a dedicated thread in each logger for doing the actual logging work (i/o). This resulted in more than a 50% improvement over slf4j5 without the dedicated thread. This has the added benefit of providing for non-blocking logging in a multi-threaded environment.

Get the code here: http://code.google.com/p/slf4j5/

Tuesday, August 21, 2012

Introducing slf4j5 - logging, varargs, String.format, faster

I was recently investigating some of the Java logging frameworks out there and really like the flexibility/abstraction layer that slf4j provides and decided to give it a try with the logback logging implementation, which is apparently the successor to log4j.

I noticed that slf4j has its own formatter built into the logging api calls for assembling parameterized strings. However, what I didn't realize is that it only accepted a maximum of 2 parameters.  Bummer.  What happened to varargs?  Turns out slf4j doesn't support Java 5 yet and it didn't sound like it was going to anytime soon.

So, I wrote a simple Java 5 wrapper around slf4j and, except for the Java 5 string formatting, you use it just like you would slf4j.  You can find it here (I'm hoping the slf4j folks will take it on as a subproject - if so, I'll update the link):

http://code.google.com/p/slf4j5/

I figured since I was adding a small layer on top of slf4j that there would be a performance penalty.  It would stand to reason, but I wanted to know how much overhead I was adding to slf4j so I wrote some tests to measure it.   I was so surprised by the results that I ran the tests over and over and reviewed the code and tweaked the tests until I convinced myself what I was seeing was actually true - the slf4j5 wrapper was actually faster than using slf4j by itself (with logback, of course).

But, how could that be? My guess is that it's primarily due to the use of String.format() rather than the custom formatter used in slf4j.

Here were the results:
In addition, I also enhanced the context-awareness to automatically log the class, method and line from which the logging call originated.

On a similar note, using this auto-detection strategy, you don't need to specify a class or a name when obtaining your logger.  For example:

LoggerFactory.getLogger() will obtain a logger for the class wherein this statement is contained.

So, varargs, advanced formatting, faster performance, auto-context detection - several good reasons to take it out for a test drive.

I will be working on the wiki, but here's an example:

public class MyClass { 

    private final Logger _log = LoggerFactory.getLogger();

    public void doSomething(int param1, String param2, double param3) { 
        _log.debug(“entering, params = %d, %s, %8.2f”, param1, param2, param3);
        
        // some useful business logic here
      
        _log.debug(“leaving”);
    } // doSomething()

    ...

The above logging statements would result in something like the following in the log file:

2012-08-22 07:33:22.543 DEBUG [main] [MyClass.doSomething():6] entering, params = 100, hello, 500.00
2012-08-22 07:33:23.618 DEBUG [main] [MyClass.doSomething():10] leaving

Let me know how it goes.

Saturday, January 7, 2012

Tuesday, April 5, 2011

Network tune-up for Windows Home Server (WHS) performance

It's all about the cables

Although I've been very pleased with my Windows Home Server, one area that has been a little disappointing is performance - until today that is.

Recently I tried restoring a 120 GB backup onto a new hard drive.  Unfortunately, WHS reported that it was going to take upwards of 22 hours - yes HOURS - to complete.  I figured there was something wrong with that so I cancelled and proceeded to investigate.  I found some interesting things on Google that said do this or that but none of those suggestions seemed to work for me.

Since my router was only capable of 100 Mbps and since my WHS box has a Gigabit LAN port I figured I would try upgrading my router.  After setting up my new Netgear gigabit router I noticed that my WHS box was only connecting to the network at 10 Mbps.  That would certainly explain where the 22 hours to restore a 120 GB backup was coming from - 120 gigabytes at 10 megabits per second would take about that long to transfer across the network.  But I had a gigabit router and a gigabit LAN port - why was the WHS box only connecting at 10 Mbps?

Well, it turns out, it was the cable.  My network, which I built several years ago, was wired with CAT5 cable.  Apparently cabling has come a long way since then and I was unaware.  But, when I swapped out the CAT5 cable from my router to my WHS box with the shielded CAT6 cable that came with the new router my WHS box was now connecting to the network at the 1 Gbps speed.  Yeah!  And, the restore of that 120 GB backup now took less than 30 minutes to complete.  Wow, what a difference.

So, if you're having trouble with performance from your WHS check your LAN cables.

I would also like to mention that the Netgear N600 router I bought has an awesome feature that I was unaware of when I bought it as it doesn't seem to be described in the product literature.  There is a button on the front where you can turn off the wireless portion of the router - very cool since all of my connections are currently wired connections.

If you want to see how to restore a backup to new/different hardware see my post on 'Windows Home Server to the rescue'

Sunday, March 6, 2011

Agile Thoughts : Sprint Length

team maturity and work definition are key factors

There are many factors that can/should influence sprint length, such as delivery schedules, resource availability, customer requirements, need for feedback, etc., but two often overlooked and perhaps most important factors are team maturity and how well the requirements/work are defined.

If I were putting together a new team or implementing scrum/agile processes for the first time with an existing team I would lean towards shorter sprints, perhaps on the order of a week or two.  I believe this would allow a team to mature much more quickly as there are more opportunities to exercise the full sprint process and more opportunities to use feedback to more rapidly move toward becoming a high-performing team.
Another key factor affecting sprint length is how well the work to be performed is defined and understood.  This includes both the business and technical aspects.  If the requirements are vague or unclear or if the technologies to be used are new or not widely known by the team then it might be a good idea to shorten the sprints to flush out more detail and get more rapid feedback from the customer on whether the team is on or off course.  Likewise, shorter, more focused sprints might help the team determine whether technology or architecture choices were appropriate and correct as well as helping to minimize risk or wasted effort.

As you can see from the above chart, mature, high-performing teams with poorly defined requirements and new, immature teams with outstanding requirements are in virtually the same place - they both need shorter sprints, for different reasons of course, but shorter sprints none-the-less.

See also:  agile thoughts : backlog preparation

Saturday, March 5, 2011

Windows Home Server to the rescue

restoring a PC to new hardware

Several months ago I built a Windows Home Server box partly to back up the family's PCs - one of which is an aging Windows XP machine that I built seven or eight years ago.  As luck would have it the last remaining SCSI hard drive in that old XP box started to fail last week, corrupting the OS and causing the machine to fail to boot.

Since I had this new WHS box I figured I had nothing to lose so I decided to try my first restore.  It was dirt simple and it worked, for a day or two, until the OS was corrupted again.  I ended up swapping out my SCSI controller for a SATA controller, added a new SATA hard drive and performed a restore from WHS onto my new hardware.  It looked like it was going to work just fine - until the first reboot after the restore.  As most of you probably guessed, the backup image did not have the drivers for my new PCI SATA card and thus Windows failed to boot.

I tried numerous things and finally discovered the recipe that would let me successfully restore the backup for my old hardware onto my new hardware:

1.  Restore the PC from WHS onto the new hardware

2.  Boot from the Windows XP CD, pressing F6 at the right time to install the SATA drivers for the new hardware

3.  Choose to install Windows XP (do not enter the XP recovery console)

4.  When prompted, choose to 'Repair' the current installation

Windows will appear to be performing a fresh install (and to some extent it is), but all of your programs and data will be left intact.  If you goof up along the way and accidentally do a full reinstall instead of a repair don't fret, simply go back to step 1 and start over by restoring the PC from WHS again.

5.  Once the repair is complete reboot into the OS and run Windows Update to recover all the patches and updates that were lost by the repair (in my case Windows was set back to SP2 from SP3 since SP2 is the service pack level of my installation CD)

6.  I would advise performing a manual backup to WHS at this point

In hindsight it seems like a pretty simple process, and it is, but it did take some trial and error to figure out.  Needless to say I am very pleased with Windows Home Server and my decision to add a WHS box to my home network.

See my post on 'network tune-up for WHS' to find out how to make the above process much faster and smoother.

Saturday, February 26, 2011

Agile Thoughts : Backlog Preparation

Two hours can make a huge difference.

I've been working in an agile development shop using the Scrum methodology for over four years now and have a few thoughts on what works well, what doesn't work so well and some thoughts on how to improve the process. The first topic I would like to discuss is backlog preparation and where that fits/should fit into the sprint schedule. 

For those of you unfamiliar with Scrum/agile a 'sprint' is a short iteration, somewhere in the 2 to 4 week range (+- a week) that consists of work selection, planning, design, implementation/development, testing, presentation to the client and a team retrospective - usually fairly rigid and in that order.

The team works from the 'backlog' - a list of features or capabilities (called stories) that need to be researched, developed or integrated into the software.  This list is created and prioritized by the 'solution owner' in cooperation with the client/customer.  But since we are talking about agile, this list can be changed frequently based on customer feedback and changing priorities.

Usually, these stories start out as nothing more than simple one line statements or short paragraphs of the form 'as a user I need to be able to do X.'  At some point in this agile/scrum process these stories need to be flushed out in enough detail so that (a) the story can become actionable by the team and (b) the amount and type of effort required to complete the story can be estimated with some degree of accuracy.  In my experience this usually occurs at backlog selection (the kickoff meeting for the new sprint where work is selected).  This usually, without exception, leads to meetings that are long, frustrating, and less productive than they need to be.

Agile/scrum teams usually try to combat this by holding 'backlog grooming' meetings throughout the sprint to flush out some of the details of these future stories and make some preliminary design decisions.  This, however, has several shortcomings that I have seen time and again:  (1) it interrupts the flow/focus of the current sprint, (2) team members are distracted by the current sprint's work and don't fully focus/participate in the thought process for developing future stories and (3) the team many times invests time in preparing stories that they will never actually work or that change dramatically by the time they do.

I use to work in manufacturing and one of the key concepts was 'just in time' - you bring the materials, machinery, and manpower together at just the right time so that inventory isn't building up or so that people and machinery aren't sitting idly by.  It's a great concept and aptly applies to software development and agile processes.  In this context I believe there is one, and only one, place for backlog preparation and that is sometime between when the team has completed its work on the current sprint and prior to the next backlog selection meeting.

The purpose of these backlog preparation meetings is for the solution owner to present the team with the stories that are to be worked in the coming sprint, for the team to ask some initial questions, and for the team to then go off and do some initial brainstorming.  The result should be stories that have a clearer 'definition of done' with some initial high-level tasking from which reasonable estimates of effort can be made.  This meeting should be short, perhaps no more than an hour with the solution owner present and perhaps another hour for the team to brainstorm and come up with an initial tasking, estimates, additional questions for the solution owner and, if need be, alternative implementations/paths forward.

The benefits to this approach are that the team is constantly focused on the work they are to be performing at any given point in time, resources are more efficiently and effectively utilized, the actual backlog selection meeting is more productive, estimates are more accurate, teams are happier and more engaged, and sprints get started off on the right foot and have a higher probability of success.

Two hours spent in backlog preparation - at the right time - can make a huge difference.

See also:  agile thoughts : sprint length

Standalone ExtJS XTemplate classes

ExtJS XTemplates are awesome!  They provide an easy way to combine custom presentation markup with simple or complex data on the client.  Sometimes that markup needs to be more dynamic than simply plugging the data straight into the template.  But, the Ext folks already thought of that and allow you to add methods to your XTemplate definition.  This is great, but can lead to gangly template definitions with scoping issues.

In a recent situation at work we had a 400+ line template definition - only about 20 lines of that was the presentation template, the rest being methods to manipulate/interpret the data (beyond the conversions we had already applied to the data).  In our situation we needed to interpret the same piece of data in different ways depending on where we were in the template (context) as well as the type of view the user wanted to see.  For those of you familiar with XTemplates you will realize that the 400+ lines of template definition are in the constructor call to the XTemplate class - basically a huge constructor parameter.  Obviously it was time for some refactoring.

I have written numerous custom components in javascript, but never one extending the XTemplate, so I decided to try making our template a custom class that extended the ExtJS XTemplate.  Turns out it worked beautifully with very little modification to the original template (other than relocating it to its own file and doing some minor restructuring).  The template markup became part of the call to the super constructor in my new class' constructor and the methods became first class citizens of my new class (which ext accomplishes behind the scenes anyway in the original implementation).

As a result the client code using the template only needed a single line to create an instance of the template, the template is now reusable if needed, the code is cleaner all around, and the scope/context inside the template methods is more natural and easier to understand.

See also:  injecting extjs components via html templates